Tutorial: Basic Editing
**** IN PROGRESS DO NOT USE ****
3 Top Workflow Edits
3 Most Useful Edits are: * * *
What you will learn
Using an example where the 3 Most Useful Edits are used to customize a workflow, and where one of them is required for correct execution, and existing Workflow will be edited.
Why is this needed?
The output from some tools may be too general to be accepted as input by other tools. Reassigning the attribute datatype for certain tools can often then permit that tool's output to be acceptable input for the next tool. The content is already present. The datatype and associated metadata instruct tools how to use it.
What kind of workflow errors are associated?
If you extracted a workflow from a history, and find that a run is producing an error, enter the workflow editor to double check tool connections and to modify datatype assignments (if needed) as one of your first customizing steps.
But you don't need to wait for an error. If you performed ANY Edit Attributes action in a history, then extracted a workflow, that same action must be edited into your workflow. These specific actions are not automatically extracted into workflows at this time. Certain tools also detach metadata assignments and produce simple tabular output. These tool's note this clearly at the top of the form under the input options.
This editing example: Reassigning datatype after using the "Cut" tool
The tool Cut produces output with a general datatype of tabular assigned. The next tool in the workflow requires a specific datatype of interval with detected metadata (chrom, start, end). This is how to add the datatype reassignment into an extracted workflow through a one step simple edit.

Open **[usegalaxy.org](http://usegalaxy.org)** in default view (click on "Galaxy" in masthead).
The **History** panel is on the far right, base color light blue (with green, yellow, etc datasets).
The option is under the **History menu** as **Extract Workflow**.
## How is it done?
Log into your account (required to use workflows). Start with the target history loaded into the history panel. For learning purposes, you may choose to run this example with the exact data used here. Source credits are at the end of the wiki. Review the data author's Page and import the published history. Use it to both extract a workflow and for source input data to run it.
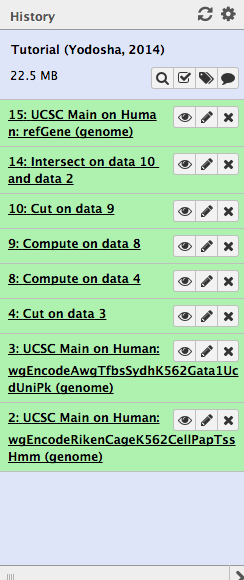
*target history*
Open the **History menu** and scroll down to the option **Extract Workflow**
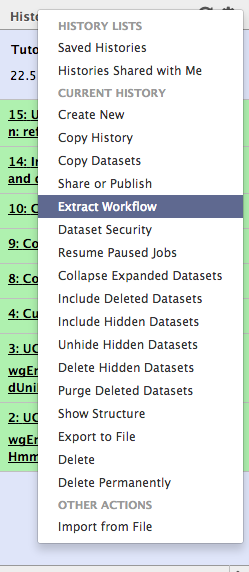
*choose extract*
Allow Galaxy to process the request without interrupting or navigating away from this view. The larger the history, or the busier the server is, the longer this will take. In most cases, this is less than a minute, but be patient.
**In the center panel, the extracted workflow will display**. If you are in a hurry, clicking on the **Create Workflow** button immediately is an option. But be aware that this may result in extra content from your history being included in the workflow that you do not need or want. So, while we are here, we'll take a quick tour of the features on this view and quickly edit:
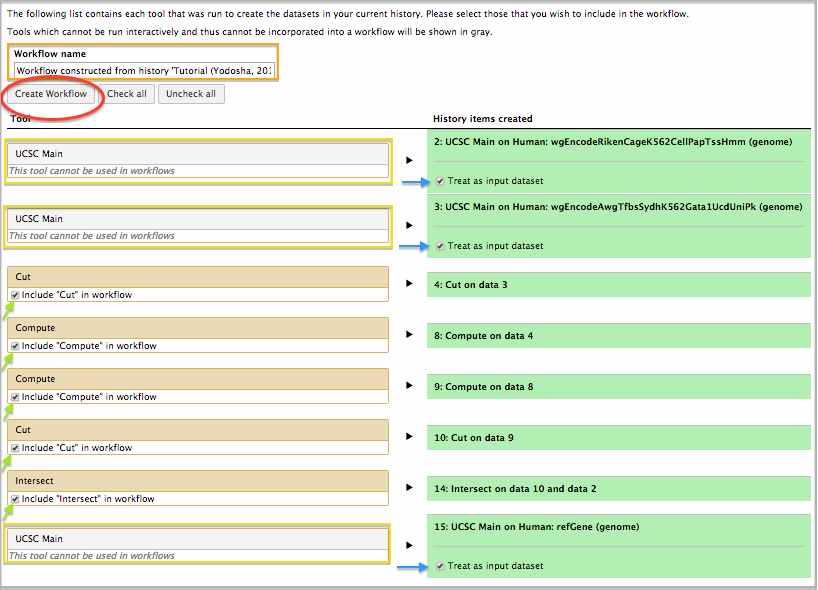
***extract workflow annotated***
* **Structure** * The **Header** contains the labels and top level control functions * The **Left** column represents the tools used in the history to generate datasets * The **Right** column represents the output of those tools * *A **workflow is** primarily **a collection of tools***. When it does contain the output of tools, these will be treated as input datasets. Input datasets are what the user of the workflow selects from existing datasets in the starting history when the workflow is executed.
- Header: Workflow name (orange box): This will be the name of the workflow. Make it meaningful.
- Header: Create Workflow (red box): Click this when you are finished making changes. This saves the workflow. If you happen to click it too soon or change your mind, you can always go back and edit your workflow later. Start with Basic Editing or explore all options linked from the Advanced Workflow wiki.
- Left: Tools that cannot be included in workflows (yellow boxes): These are tools that are run externally from Galaxy (in whole or in part) and return data back as a dataset. Most of the tools under "Get Data", including "Upload File", and the "Upload" function above the left Tool Panel, are included in this category of tools.
- Left: Tools that can be included in workflows (green arrow): These are tools run within Galaxy. Each has a checkbox. If the tool is part of the analysis path you wish to retain, leave it checked. If it was a dead-end, or a step you no longer need, or even just part of a group of steps that you don't want in this workflow - uncheck the tools and they will be omitted from the workflow. It is important to note that changes here will not impact your current history - all existing tools and dataset remain unchanged.
- Right: Datasets that can be included in workflows as input (blue arrow): These are the datasets that were either the output of tools run externally to Galaxy (in full or in part). Datasets that resulted from "yellow box" tools, uploaded datasets, and copied datasets (from another history or imported from a library/another history) are included in this category. All workflows need to have inputs! When there are several inputs, or it is confusing about what the expected input should be (for example, when workflows are shared or published), this is when you'll know that it is time to review the help in Basic Editing.
- Right: Datasets that cannot be included in workflows (no annotation): these are the datasets that were created by the tools that can be included in workflows. This are the datasets your workflow will be creating when you run it. The content next time will be based on the content of the inputs provided and what operations the tools perform.
For this example, the checkbox for dataset #15 can be unchecked, because there are no tools that will be executed with that dataset as an input. Also note that there are two input datasets and keep track of which comes first. In the workflow run display, the order will be the same.
After customizing, click on **Create Workflow** to save the extracted analysis as a workflow. For this operation, it is also important to allow Galaxy to process the request and to not navigate away from the view. You'll know that the workflow is created when the bright blue *completed* box appears.

*confirmation that workflow as created*
After this, your next thought may be: *but where is the workflow now?* In your *Saved Workflows*! Go there by clicking on the very top navigation menu bar option **Workflows**.
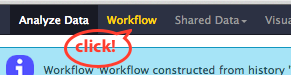
*top menu bar "Workflow" option*
After clicking on the top menu bar option **Workflow**, an account's **Saved Workflow** view is reached, and it will look similar to this:

*workflows saved by you*
It also lists **Workflows Shared with You** (if any). Under **Other Options** is the button for the special function described in the wiki *[How to turn your workflow into a tool...](/learn/advanced-workflow/tool-panel/)*.

*workflows shared with you*
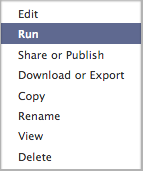
**To use this workflow right now, or another that just created, do the following to set up a run:** 1. Click on **Analyze Data** to return to the default Galaxy view with the source history active in the history panel (it should be if, you are following the above steps). 1. Or, use the **History Menu -> Saved Histories** to bring up all of your saved histories to select the one with datasets you wish to run your own workflow on. Or, click on **History Menu -> Create New** and upload new datasets (and prep as needed, if data prep was not included in your workflow). 1. Click on **Workflow** from the top menu bar to reach your *Saved Workflows*. 1. For the workflow you just created, click on the workflow's button to bring up the workflow menu and choose run, it will look like this:
 1. Now your workflow will appear in the middle analysis panel, with the active history in the right panel. **Select the inputs** from the available datasets in the history. Datasets that meet the "datatype" metadata criteria will be filled in by default, but these can be adjusted using each input pull-down menu as shown:
 (workflow with input menu choices graphic) 1. Use default options for all other settings. Scroll down to the end of the middle panel and click on the **Run workflow** button. Once again, allow the request to process. Once confirmation that the workflow is launched, noted by the green box in the middle pane and the workflow datasets added to the history, you can proceed to other analysis while the jobs run.
(workflow with input menu choices graphic)
## Help! I don't see my workflow datasets
There are two reasons why the output is not in the current history. One possibility is that you did not wait for the confirmation that workflow was actually started (the "green box" confirmation in the step directly above). If you think this is the case, go back and run it again. But first, check for the second possibility: did you check the box to send the output to another history? The option is at the bottom of the workflow submission page and is called Send results to a new history. The name can be modified, but the default history name is the same as the workflow name. Look under History menu -> Saved Histories and check if your data is there.
There is a third possibility, but this only applies when the workflow has been edited and only some of the datasets appear to be missing. Some of the datasets are *hidden*. To reveal them, use **History menu -> Include Hidden Datasets**. More about *hidden datasets* is in the **[Basic Editing](/learn/advanced-workflow/basic-editing/)** workflow wiki.
## How do I know the workflow is really running?
The datasets for the workflow will be in the history panel. These jobs run just like every other job. Some may run right away, others may queue. More about how datasets execute is in this wiki: Dataset status and how jobs execute
## I want to customize my workflow further
Good idea! Read more about workflow operations not covered in this wiki, in others linked from here: Advanced Workflow
## I can't create or access Workflows
Are you seeing one of these messages below? This indicates that you are not logged into your account. Workflows can only be used by registered users. Log in under User -> Login or create an account under User -> Register.
*"Create Workflow" message when not logged in*
*"Saved Workflow" message when not logged in*
## Example history credits and source
We would like to thank Galaxy community member kawaji for the history used in this example, sourced from the Published Page Tutorial (Yodosha, 2014).