Why edit a workflow?
In many cases, a workflow can be directly extracted from a history and run without any changes.
However, in certain cases, tools require that small changes are edited in to ensure proper output → input connections. Plus creating a new workflow from an existing workflow is a quick way to develop a new, but similar, process. Knowing how to perform basic workflow editing is a valuable skill for all Galaxy users.
In short: even just learning how to make small changes makes workflows accessible to everyone
Where is the option?
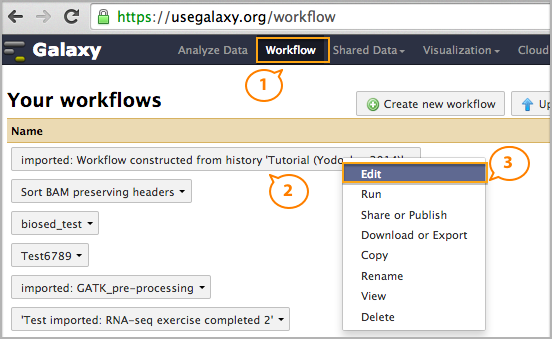
Open usegalaxy.org (or any Galaxy) from any view.
1. Click on Workflow in the top menu bar.
2. Click on any existing workflow's button to reveal the workflow pull-down menu.
3. Select Edit from the menu.
Select Copy first, then Rename and Edit the copy if you are using an existing workflow to create a new workflow.
Editor Layout
Selecting Edit opens the workflow editor view. Each of the major landmarks is used for a specific purpose and is defined on this wiki page. Below is the annotated view. For a look at the view without annotation, click here.
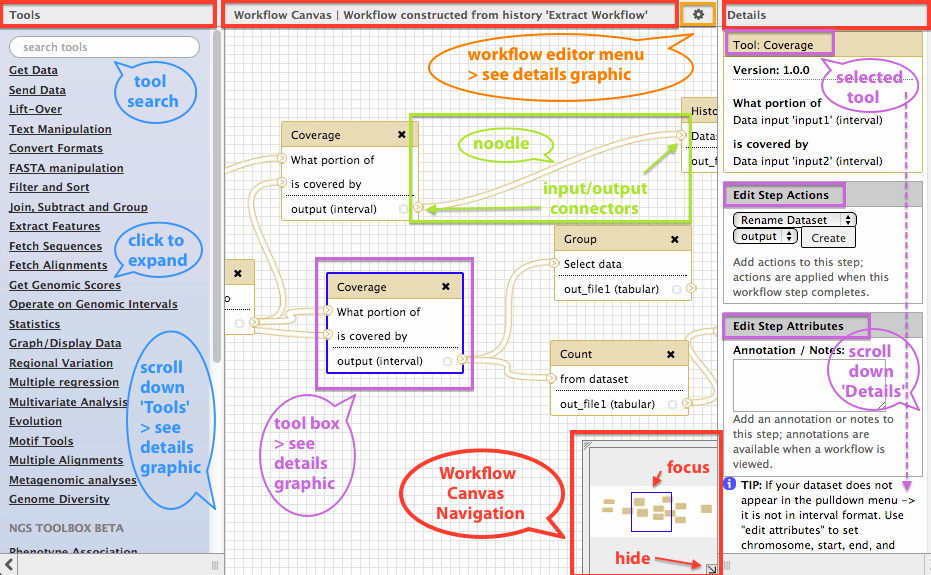
Workflow Canvas
The canvas is where inputs, tools, and noodles are added and connected as you build and modify your workflow. If content is on your canvas, it is in your workflow.
(annotated top center red panel in the Editor Layout above)
Navigation
The navigator provides a full view of your workflow in a condensed format. Slide the blue box around to bring sections of your workflow into focus within the canvas where the contents can be added, deleted, examined, or edited. If it is in the way of your work, toggle the size of the window with the the lower right corner hide function.
(annotated bottom center panel red in the Editor Layout above)
Editor Menu
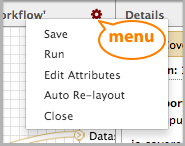
Accessed by clicking on the gear icon on the right side of the center Workflow Canvas upper bar, the workflow editor menu is for global editor actions. (annotated orange in the Editor Layout above)
- Save - Be sure to save your changes before leaving the editor or they will be lost! If you do try to navigate away from the page without saving, you will be reminded with a pop-up warning (see Close below) - choose Save Changes to apply modifications to the workflow.
- Run - After saving, you can choose to start a run with your new workflow directly from the editor.
- Edit Attributes - Edit the name of your workflow and add in a description. Both will be displayed with the workflow is executed and if published (a Sharing option), part of the information listed on the Published Workflows page.
- Auto Re-layout - Have your datasets and noodle connections become tangled and confused? Try this option to clean things up!
- Close - Saved and are done? Or, made changes that you'd rather leave behind? Close it up and choose Don't save when this pop-up warning appears.
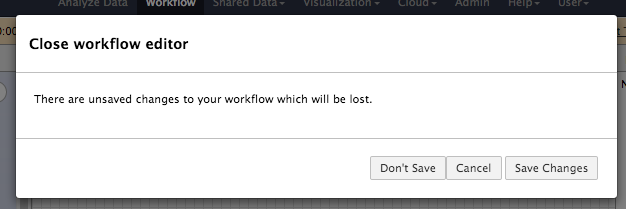
save changes or don't save?
Left Tools Panel
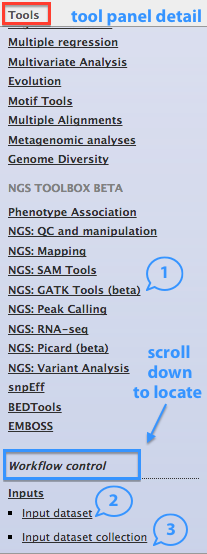
Located at the far left in the editor layout, the Tools panel contains all the the tools available on the instance plus a special group for input datasets. (annotated left panel top red and underneath "blue" in the Editor Layout above and Tool Panel Detail to the right)
- tool search - Search for tools by name
- 1: tool groups - Click to open tool groups to reveal tools. Click on a tool to add it to your workflow canvas. More about toolbox features below in ToolBox Details.
- workflow control - Scroll down to the bottom of the panel to locate this special section of workflow-editing specific canvas items.
- 2: input dataset - Click to add to your workflow canvas same as adding a tool. More about inputs below, see Key Edits: Adding Inputs.
- 3: input dataset collection - Click to add to your workflow canvas same as adding a tool. More about how dataset collections differ from datasets is pending wiki documentation (brand-new!).
ToolBox Details
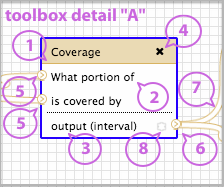
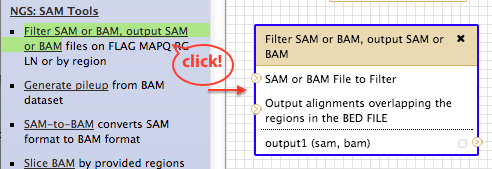
A toolbox on the workflow canvas represents a tool action or job performed on dataset(s) as they pass through a workflow. On the canvas, input and tool connections and hidden status are set. Specific settings for a tool are made in the far right Details panel, explained below. (annotated center panel "purple" in the Editor Layout above and toolbox detail "A" to the right)
- 1: tool name - Exact tool name.
- 2: tool description - Short portion of the tool description or actions.
- 3: output name/datatype - Name given to the output and the datatype when it is specified by the tool.
- 4: delete - Click the "X" to remove (delete) the tool from your workflow.
- 5: input connection(s) - Where the input for the tool is supplied through a connecting noodle from an upstream tool output or input dataset.
- 6: output connection(s) - Where the output from a tool exists the tool and is sent through a connecting noodle to a downstream tool (unless this tool produces a final output dataset).
- 7: noodle(s) - How input datasets and tool boxes are connected. More about noodle connections is below in Key Functions: Noodle-y Connections.
- 8: hide toggle - Datasets that result from tool execution can be displayed in a history or hidden. More about hidden datasets is below in Most Useful Edits: Hidden Datasets.
Right Details Panel
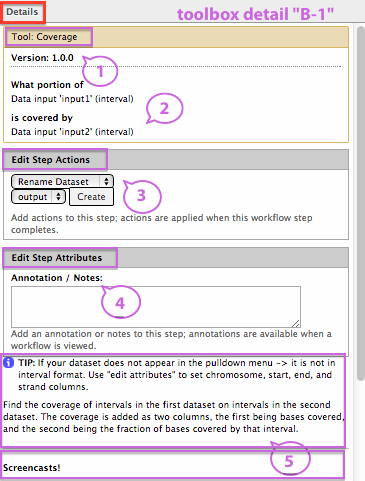
The details panel is where tool settings are made and adjusted for the selected toolbox on the workflow canvas. Some settings are the same as those made when a tool is executed from a history (the settings on the tool form). Others are workflow-specific options. (annotated right top red panel and underneath purple in the Editor Layout above and toolbox detail "B-1 & B-2" below)
- tool: tool name - The exact name of the tool being edited. Same as in the toolbox.
- 1: version - The Galaxy wrapper version for the tool. Note that this is not the same as the underlying tool executable version (both are available on the
 info form for a completed job).
 - 2: tool description - Short portion of the tool description or actions. Same as in the toolbox.
- 3: edit step actions - Workflow-specific actions that can be applied when a tool is executed and are sometimes necessary to create appropriate noodle connections between tools (such as datatype assignments). All pull-down menu options are explained in: Advanced Editing and Using Variables.
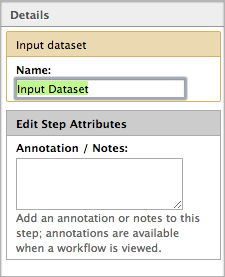
- 4: edit step attributes - Workflow-specific annotation/info that can be provided to describe what a tool's purpose is, expected input content (if an input dataset box), and other communications directed to users of the workflow. This annotation is displayed when a workflow is viewed or when it is run.
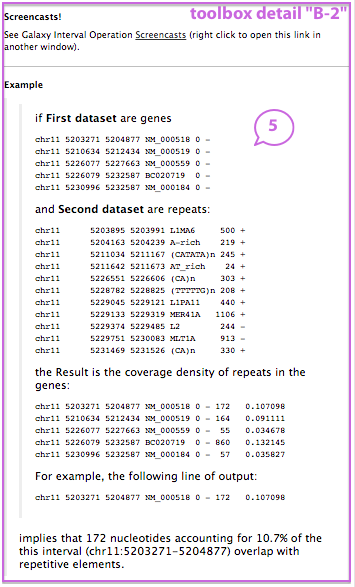
- 5: tool form info contents - Exact contents displayed on a tool's tool form underneath the settings. This is provided in the workflow editor to assist with correct setting and connections for included tools.
 continued on....
Key Functions
Adding Inputs
Inputs in your workflow are a special class of object. When a workflow is run, the inputs are selected by the user from datasets in the current history. The generation of original inputs cannot be added to a workflow - through the use of "Get Data" tool functions or otherwise. Add input datasets as boxes to your workflow canvas the same way as you do tools:
- click on input dataset in the far left Tools panel (scroll to bottom to locate)
- once on your canvas, drag a noodle from the output connection over to the downstream tool's input connection.
- save your work!

adding and connecting inputs
Noodle-y Connections
Noodles represents the flow of data from one step in a workflow analysis to the next. These will link input-output connections with compatible datatypes.
- When dragging a noodle from a tool's output connection, tools with available input connections will highlight as green on the workflow canvas. See the graphic above in the section Adding Inputs for an example.
- When you want to remove a connection, hover the pointer over the noodle until an "X" appears. Click on it to delete the noodle.
- Some tools have more than one input connection, some have more that one output connection. Each may be of a different datatype. Confused? Click on the toolbox then review that tool's help at the bottom of the far right Details panel.
- If your connection is broken or will not link, see the help below Most Useful Edits: Assign Datatype. This will not resolve all connection problems (the data must be compatible between tools!), but the most common.
3 Most Useful Edits
Label Inputs
When a workflow is run, the user selects a dataset from the history to be used for each input in your workflow. Give them a label to make sure that the correct dataset is selected.
A good label may include:
- the expected content of the dataset (reference annotation, gene bound coordinates, ...)
- the expected format of the dataset (BAM, BED, GTF, ...)
- the exact name of a dataset. When? If it is provided in a library or Page (as a shared history with datasets).
To label an input:
- click on the input box on the workflow canvas to bring it up in the far right Details panel
- type in the new name that you would like to be displayed to the user.
- include extra annotation if the dataset needs to be created in a specific way or has other important details
- save your work!
Hidden Datasets
Hidden datasets are a useful way to avoid displaying intermediate datasets from longer workflows in histories. The general usage is to only display final outputs. To do this:
- click on this toggle on output datasets - any not set will be hidden.
- by default all datasets are displayed, even with the toggle unset.
- hover over the hide toggle to view the help pop-up, shown below.
- save your work!
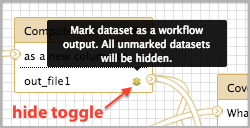
*hide toggle* location in *toolbox*
Assign Datatype
A tool may require a specific inputdatatype in order for it to be used correctly. In some cases, you will find out about this after extracting a workflow, viewing it, and noticing a missing noodle connection. Other times it will come up during creating or editing when a downstream input connector is not accepting a noodle from an upstream tool's output connector (not turning green). This can indicate a true data incompatibility or a formatting problem. But sometimes just reassigning the datatype for the output in the upstream tool is enough to resolve the issue. Example:
- calculations were performed on a bed file adding extra fields
- the result data was then processed by the Cut tool to create an interval dataset for further analysis
- however, the Cut tool always breaks metadata column assignments, resulting in a tabulardatatype assignment
- the output connector's noodle from the Cut tool will not connect with a tool that requires interval format, such as a tool from the group Operate on Genomic Intervals
- what to do? answer = reassign the datatype for the output from the Cut tool in your workflow
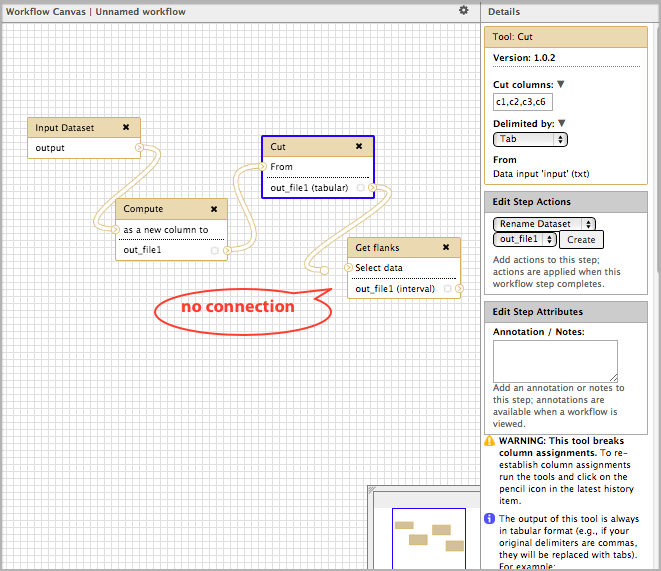
before datatype reassignment, no connection

editing datatype
How to edit the datatype assignment:
- click on the Cut toolbox in the workflow canvas to bring it up in the far right Details panel
- 1 - under Edit Step Attributes select Change Datatype from the pull-down menu
- 2 - click on create to open the edit options for the section
- 3 - choose interval as the new datatype assignment for the tool output
- 4 - optionally, add a comment to this workflow step to remind yourself and any other users you share it with what was done as an extra data manipulation
- save your work!
When changes are complete, click on any other tool to internally refresh the setting for this tool, then try the noodle connection again.
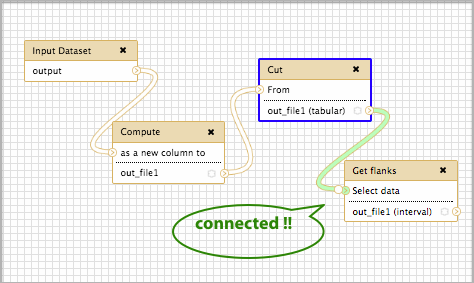
after datatype reassignment, connected!!